Wednesday, April 29, 2009

Color Me Bad

Still playing around with ideas for the table. But Lu came up with the genius idea of possibly painting it charcoal grey to help bridge the gap between modern and traditional by giving the traditional table, more of a modern "edge".

I think I really like this idea... but now I am torn on which exact shade of charcoal grey. (You had to know this was coming).

I think that Lu meant something along the lines of this little fella's coloring.

But a quick squizz in the Behr.com paint lab I discovered this little paint chip:
What do you think of the last two? I think that Evergreen Bough (bottom) might be too green. But Dense Shrub could do the trick.

Or should I just stay with the regular dark grey color of the Behr bear?

I shot an email off to that master of makeovers Kate from CentsationalGirl.com to get her advice on color. Will let you know what she thinks!

Tuesday, April 28, 2009

Craigslist Treasure Hunting

Look what is on it's way home right this minute?

Ok. I know what you're thinking... You're thinking, "WHAT are you thinking?" Am I right?

Ok, hear me out!!

This classic lined, beveled be-glassed beauty was only $15 and I have big plans for her future. We need a new coffee table. I had a few in mind, but they were all too cold and modern for our taste. Now, I know, we have the uber modern sectional couch that we love... but that doesn't mean we can't play a little mix and match does it? The "vision" for the living room is evolving every day and we want something more classic, and perhaps traditional than what we are working with now. My plan is to go with the flow and buy what I find beautiful and edit when we're done. If that means we lose the couch then we will cross that bridge when we get there. For now though,
I think we can make it all work together.

Stay tuned for the mind blowing (I hope) after pics of the table next week.

P.S. Please know that the above pic was taken from the Craigslist listing and is NOT our living room. kthxbai

ETA: Holy Cow!! Table is here and it's GORG! The bottom shelf has woven wicker/rattan-ie stuff on it. Totally chic! Love it! There are some scratches and spots of discoloration, but nothing that some paint or stain couldn't solve. Wouldn't you know it... a quick scan of Craigslist this evening uncovered this little beauty: http://austin.craigslist.org/fuo/1144900821.html I think I like this version more than the one we got!!! Oh well...

Now, my question for you is... white paint or chocolate stain?


In the light of the evening the wood appears darker, and I have to say that I do really like the look of it, but I need to remember that we're going to have lot's of white pieces around the room (living/dining) and I want to keep the balance. Honestly, I think that the lattice work would look much better in chocolate stain than white paint. What say you?

Weekend Project Update!

Ok, so I know some of you have been standing by since Sunday waiting for the updated pictures. Unfortunately, there really isn't much to see this week. Not because we didn't DO anything, but rather because what we did appears so incredibly unremarkable that it's almost not worth showing. LOL

So you may remember that our mission was to continue sprucing up the garage/office. (Almost ready to start calling this the office and not the garage.) Here are some pics to remind you of the before:


Then last weekend, we did the floors remember?


This weekend, our plan was to tackle the walls by painting just plain primer for now to brighten things up (we can't Paint Paint because the walls need some serious work). I also wanted to clean up the peg board and put it to use. And lastly, we wanted to insulate the garage doors more.

Here's my gorgeous other half painting on the primer:
Seriously... is there anything cuter than a man with a paintbrush in his hand? I think not!
(please note that that was one sprayed on coat of Krylon Avocado Green. We laid a further 2 coats on later).

Here is the finished product... look ma, things hanging up and not on the floor! (Well, you can't see the floor and you won't until the room is finished.) Yes, I know the pegboard could use another 2 coats or 20... but seriously, the Krylon is more for outdoor use! We were totally paint bombed into quitting... and the room still reeks of spraypaint 3 days later! We may need to revisit the peg board this weekend.


And here are the new almost insulated garage doors. I say almost because we need to go and get more panels to cut and fit into the gaps. Strangely, just these half covered panels are already making a difference in here. I am so excited to get the rest of them on, and have the ceiling sorted out, we won't know ourselves!


Still need for this room:

- Area Rug to break up the grey and add warmth to the space.
- Really fabulous desk lamps
- Cable tidies for all the wires
- Walls repaired
- Ceilings properly finished
- Fabric panels for the garage door
- New, bigger window
- Proper lighting
- Tuck ugly outlet wiring behind drywall
- Art
- Shelves & storage
- A shed... no, not for inside the office, but to place outside the house so that we can get the mower, Christmas decor, camping stuff, etc out of here.
- Peter's new TV console for his Xbox and accoutrements

There... that's not much right? LOL

If all my clients pay this week, I hope to have some much more exciting, BIG impact projects for you this weekend. *fingers crossed!*

Friday, April 24, 2009

Weekend Project: Office Paint & Insulation

Well, it's Friday again and you know what that means... time to get our weekend project on the table. You may remember that last weekend, we tackled the garage and spare room... well more the garage than the spare room truthfully.

This weekend, our plan is to insulate the garage and get some paint on the walls to make them look less... what is the word I am searching for, um... manky? Yes, manky is a good word to describe them. We're not going with our final paint choices mind. The walls in here are still in really bad need of repair, so we will just be slapping up some clean white paint to tide us over for now. To brighten the space and add to the "garage no more" look we are shooting for.

The office walls are in a bad state of repair and could use some patching, we'll be painting around those spots for now until the rescue team in the form of my mom and step dad arrive in July. They're nothing a cleverly placed pot plant can't hide anyway.

Also coming up is the peg board rehab. We have a great peg board in here, but it needs a coat of paint and sadly... no pegs! It's time to remedy that and get some of our garden tools up off the floor and stashed away.

Other plans are to photograph the last of the items going on Craigslist and get them posted this weekend so that we can make more space.

If we're lucky and have some extra time, we are also going to dig through the spare room and try and get that more organized as well. Now that last weekends garage toss pile has kindly been removed by Round Rock Refuse, we're ready to load up our bins again with all the extraneous bunff we've got cluttering up the guest room.

We'll also be measuring for our new fence as we're all set with the plans to rip out the old fence to make room for the beautiful deck this summer.

Wish us luck! Look for your weekend project update on Sunday evening as usual.

Kitchen Inspiration


Wednesday, April 22, 2009

This Makes Me Wish We Had Mud to Deal with...


Totally cute! But more importantly, totally eco friendly. *Note to self: MUST get cute gumboots!*

Happy Earth Day Peeps!

Tuesday, April 21, 2009

We've Got It Covered...


Well, I had hoped to wait till both sides were complete before posting this, but I am at a loss for something new to post this week and we have decided to wait on hanging the other blind until we can get our hands on a stud finder (where was this miraculous tool when I was single *da-dun-dump!*)

I think this might be one of my favorite things that we've done and it was probably one of the simplest. Following the idea shared by John and Sherry of ThisYoungHouse.com I got a great deal on these bamboo blinds from BB&B and they were one of the first things we ordered when we moved in.

Peter still thinks this was totally unnecessary as he says you can barely see the cupboards unless you're IN the laundry area... but I know they're there.... Here's that same space sans blinds... You tell ME if the difference is worth it?

Sunday, April 19, 2009

Weekend Project Update!


Well it's 6pm on Sunday and while we've done a BUNCH of work, we've not completed everything on our list. (But we did a great job of everything, so I am ok with it).

Saturday went perfectly to plan. We cleared boxes, donated to charity and emptied all but Peter's table out of the garage.


We vacuumed, and swept and vacuumed and swept till we were happy that every last speck of dust had been removed, and then set about painting. The painting part went really quickly, I think it took us just under 2 hours start to finish and we did a great job! There are parts of the floor that had deep set grease stains that just wouldn't lift, so the paint is blotchy in places, but this afternoon it was dry enough for us to replace our furniture and start moving things back into the office, and get set up properly. I must say, the walls now look absolutely awful. With the floor looking so fab it really draws attention to the awful wall situation in here. But we'll get to them soon enough.

For now, we're just happy to have a clean office to work in. We started off throwing down the paint flecks that came with the paint, but after doing the top step decided that the look was more "garage" than office and that the grey floor actually looked perfectly good without them. I had to make a quick decision as the paint was drying fast and decided to scrap them for the rest of the space. Ultimately, I think the specks would have detracted away from the different concrete textures, and the oily patches, but all in all the room looks less like a garage now... moderately...

I have been toying with the idea of giving you a new picture of the garage with the painted floors, etc. But we have more plans for things we want to do in here next weekend, and I think I would rather wait until we have them done before I share the full view, so for now, here is the floor.

'Scuse the foot, but I had to put something in the shot, or it would have been a big grey square.

This foot, I assure you, was unintentional. But here you can see the two different floors. Speckled
floor is on
the raised portion of the floor, the plain grey is the rest of the room. You can also see one of the
greasy marks on the top left.


In other news, while we haven't totally conquered the box room, I did manage to set up a little crafty area in the guest room closet. It's small, but adequate and works well for me. I have a little piece that I can do what I like in, and my gaudy collection of crafty bits and pieces now all have a home out of sight. And such a CUTE home too! OK. So guests don't exactly have the roomiest space to hang their clothes when they come and visit us, but it's not like we have a ton of overnight guests, and most of the stuff can be packed away when guests come to stay.


Please pretend not to notice the linens about to topple off the top shelf.
We're still working on a "system" to keep everything in order up there.

So there you have it! Our weekend's work. I did also get one hung blind out of P, but honestly it was such a mission I haven't dared to ask for the second to be hung... I'll hit him up for that this week sometime, and then show you pics when we have less stuff piled up in the garage. My other mission for this week... take pics of and list all the leftover furniture on Craigslist/Freecycle and get RID of them!

Friday, April 17, 2009

Weekend Project: Garage & Spare Room Domination


OK. So we need to admit that our office is still a pig-sty and the spare room is still just a room with a bed and a ton of boxes. We plan to remedy that this weekend.

Here's our plan of attack.

SATURDAY:

First up, we're throwing out all the boxes already unpacked. (I am SO mad that our local recycling service doesn't accept cardboard boxes. REALLY lame in my opinion).

Second, we're making a run to Goodwill to drop off the "Donate" pile that has been growing in our garage for MONTHS. (Yep, we MOVED our donate pile with us.)

Third, we're moving everything else out of the office for the rest of the day/night. And then painting the floor as we planned to do before we moved our stuff in. Kinda wish we were painting the walls at the same time, but I take what I can get.

SUNDAY:

Fourthly, we're moving all the office furniture back into the garage.

Fifthly, we're moving all office related stuff out of the spare room and into the office.

Sixthly, we're finishing off my crafting space and linen cupboard in the spare room.

Seventhly (?!?), we're cleaning, and setting up the spare room.

Then we're done!

Oh wait... if I ask really nicely, I am hoping that P will help me hang the blinds over the shelves in the laundry area as well. Might be pushing my luck with this, but a girl can dream can't she? LOL

Thursday, April 16, 2009

Shedding Some Light on the Situation


We're soooo excited! The electrician made a visit this morning and made all outlets GFCI, upgraded the trip wire (or something...), installed an extra outlet in the garage, pointed out that my dryer socket DID in fact match the plug... (LOLZ!) and last, but certainly not least... he finally hung our West Elm Capiz Chandelier. Just LOOK at it in all it's sparkly, tinkl(e?)y glory!


Something to note for those of you out there who have bought this chandelier...

1) It doesn't come with a ceiling plate. We had to reuse the brass one from our old chandelier. Not pretty, but it will do for now.

2) As it is designed to be a "plug-n-play" lamp, the wiring side of things is a little more technical than you'd think.

3) When cutting into each little plastic wrapper on the strings of shells, be VERY careful not to snip the fishing gut on one that has already been released. (We lost one string in the unwrap process).

All in all, I am VERY happy with it. Because we don't have a separate dining room, the chandelier grounds the area and makes it feel more defined. I also like the play between the stark, dark table, the "classy" chandelier and the modern white chairs. The chandelier brings just the right touch of drama to the space, and makes it feel special. Now if I could just find a bowl that fits the scale of the new dining table, and something for the wall to further define the area I will be happy.... Peach paint, textured walls, vertical blinds and popcorn ceilings are still there unfortunately, but we'll get there eventually. It took us a year to finally have a home to put the chandelier up in, whats a few more months to give it the surroundings it deserves.

Wednesday, April 15, 2009

Saturday, April 11, 2009

We've Finally Made It!

Yup... we've been recognized at last!

On our latest run to Home Depot -- for primer, paint and sandpaper for the ceilings (we decided to bite the bullet and paint) -- the check-out guy [AKA our fifth best friend in Round Rock] recognized us and said, "Hey you guys are doing a lot of work. We see you here a lot!"

That's right... we're now officially DIY'ers. When the peeps at Home Depot recognize you, you KNOW you've hit the big time!

Weekend Project: More Poppin'


On Friday evening we ran over to Home Depot to grab supplies for this weekend.

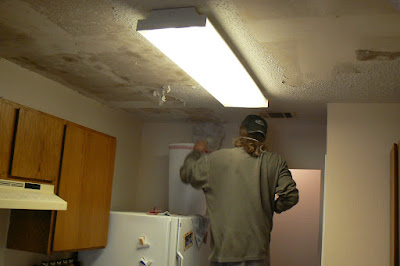
Today we picked up where we left off and are spending the weekend scraping more of our ceilings. The kitchen is now done, as is the entry way. All we have left are the bedrooms, one bathroom and the great room, but due to the steep ceilings, 15 feet at their highest point, there is no way for us to reach, even with our new ladder. We're going to have to come up with an alternative for this room... Typically, it's the popcorn-ed room that bugs me the most and it's the one room I cannot fix.


Now we have a decision to make... do we sand and paint them now, or do we smooth the walls and THEN paint? What do you think? Ultimately, you should paint ceilings before you paint walls, right? But what if you need to re-texture those walls before you can paint?


Honestly, while I don't like textured walls, they wouldn't bother me so much if they were uniformly textured throughout, but alas they are not. The previous owners did some AWFUL patch jobs on the drywall. The corners are just terrible, as is the peak of the arch in the kitchen. In fact... while removing popcorn, we also discovered that some walls had been "patched" using regular silicone caulk, meant for bathrooms!


I have a strong feeling that we need to leave the ceilings until we smooth the walls out.... trouble is, it's going to take us AGES to get them smooth. And it's going to involve a lot of sanding! Ugh... Part of me just wants to re-drywall the whole thing. LOL. Wishful thinking right!

Well I mean... how expensive is white ceiling paint going to be? I suppose we could just go ahead and paint them and if they get "dinged" during the wall smoothing process, we can just patch paint. Yeah... I think that's the best idea!

Tuesday, April 7, 2009

We're Taking a Break...


Diesel sleeping on some new paint rollers from Home Depot.

Monday, April 6, 2009

Somethin's Poppin'!

Here's your popcorn progress update:


So far the guest bathroom and passage ceilings are done... but we're not even half-way. Still the entryway, the great room (argh!), both bedrooms and the master bath to do.

We discovered some... uh... creative drywalling. In the passage, instead of taping the top edge of the wall, but we discovered that someone thought caulk would do the trick just as well. So of course, after scraping the caulk out of the gap, it looks like we're going to need to retape that wall-ceiling join. Not bad though.

The system we used tonight was just straight water and a scraper. It was effective enough on the unpainted popcorn, however the painted popcorn (in every room but the bathrooms) it required a lot more scraping than we were expecting.

This weekend, we're going to try something different:


Watch at about 2 minutes in. Keep your eye on the bubble. OMG!! We're trying warm water, vinegar and a proper sprayer in place of the pump action water misting bottle.

Anyway, the two "finished" rooms need a bit more work. We're nervous about getting the drywall too wet because we don't want any chance of mould. Looking at the various videos I've watched, I see most people wetting things MUCH more than we have. Going to get a bit more aggressive this weekend, but will put a fan on the area as soon as the popcorn has been removed.

Anyway... that's enough of adventures in popcorn country for one day.

Popcorn Be-Gone


We just sprayed a little water and grabbed a spoon to check if we can scrape the awful popcorn from our ceilings and whaddaya know... We CAN!!

We're so excited about this! Popcorn ceilings are just so unattractive and we're popcorned throughout the house. It will require a lot of patience, a lot of arms above the head, some scrapers and a spray bottle.

Here's what we're dealing with...
Oh... I know what you're thinking... WHAT THE HELL WITH THE CRACK!!
Looks bad huh? Well, never fear. We aren't that stupid. We bought the house knowing that it had had complete foundation makeovers twice in it's life, (and we have lifetime warranties on both). Once in the front, and once in the back. This caused the middle to show a few cracks. We have it on excellent authority that the cracks we are seeing are because of the split lift, and are nothing to worry about at all.

Bottom line... we KNOW there are going to be some surprises after we remove the popcorn. We KNOW we are going to have to have a Taper on speed dial.

And we KNOW we want that popcorn gone!

Shopping List:

- Pump spray bottle
- Two large paint scrapers
- Dust masks
- Step ladder
- Drop cloths

I can't wait for the weekend!

Sunday, April 5, 2009

Kitchen Inspiration

So it's late and I need to get to bed, but I HAD to share some inspiration pics for our kitchen.
I'm a little worried that it may be a bit of a green overload -- I don't want it to look like a St. Patrick's Day Parade. But the colors in there need to compliment the rest of the house where green hues will be featured A LOT. The bottom line is... the kitchen has no window (yet!), it's dark and dreary at the moment, and could use a bright, fresh, clean look -- without being too clinical in all white.

This tile (the glass subway tile in a sea green color):

Picture Source: DGRTiling.com

These knobs/pulls:

Picture Source: MakingItLovely.com


This wall color (Luurrrvvee the splashes of red):


Picture Source: DesignSpongeonline.com

This color on the cabinets (maybe darker on bottom, lighter on top?):


This counter top (still undecided, but we want an acrylic Corian or Silestone in a green-grey):


What do you think?

Saturday, April 4, 2009

Weekend Project: Curb Appeal

Well, we did it! Our first project is now complete... well, it's almost complete, we still have a few other things we want to add before we can completely cross it off our list, but we're just happy to have made as much progress as we did for as little moolah as we spent.

Behold, I give you Operation Curb Appeal.

Here is the not-to-bad starting point.


Here are the spoils of our $200 Home Depot shopping spree.


Here is the (almost) finished product.


I think it's a huge improvement. Everything just looks "fresher", as though our house spent a week at a spa and returned to us well-rested.

Here's what we did:
  • Replaced the builders standard, totally 80's house numbers for these slick brushed stainless ones.
  • Replaced the beat-up mail box.
  • Inserted solar powered path lights in a brushed stainless finish.
  • Planted the front bed with some annuals, perrenials and ground cover with interesting leaf shapes and colors.
  • Added a bouganvilla plant for some height. Our hope is that it will grow up the soon to be placed trellis and cover up some of that drab grey brick wall.
  • Lastly, I cleared an easy water run off round the sides of the beds, so that water can easily drain away rather than sitting and creating a big muddy mess.
  • As a finishing touch, we added a hanging fern to soften the porch and
  • Threw down a bright, fresh welcome mat to finish things off.

What is still on the cards:
  • Repainting the house in a sage green color, with a red front door.
  • Adding a bright red bench.
  • Replacing those ugly, outdated light fixtures for contemporary brushed stainless ones.
  • Planting the facing bed.
  • Replenishing grass seed.
  • Maybe adding a third bed in front of that little retaining wall
  • Oh, and fixing the retaining wall where it has come loose.

We're really happy with our first little project. I know what you're thinking... "What about the inside?" Well, we hear ya. BUT, with closing costs, tax being due and my upcoming visa renewal we need some time to save up for those larger projects. We do have some big'uns on the cards for the summer. I will let you know more as we get to them. But for now, our el'cheapo first project was a good one for us to tackle.

Our front yard is the first thing people see when they get to our new house. It was an instant facelift! We feel that it was the best way for us to spend our $200 for the most bang. What do y'all think?